Showing posts with label personal projects. Show all posts

Wednesday, October 2, 2013

The Ones I Forgot

I realized the other day that I never shared two quilts that I made earlier this year. Both were made as gifts and are currently being greatly loved in their new homes.

The first quilt I made back in April/May for my sister's birthday. Funny story. Recently, I've started giving family baby quilts at baby showers/births. At my sister-in-law's shower last summer my sister said something to the effect of, I missed out! It looks like you have to have a baby to get one of your quilts! (She has 6 kids, her youngest is the same age as my oldest.) So I took note and decided to make her a birthday quilt on her next birthday. I included a note with the gift and said, "Because you don't have to be having a baby to get one of these!" She loved it.


The quilt is Piece of Cake 3 by Thimble Blossoms. I actually made it as part of Camille's class on Craftsy. Awesome class. I learned so much from her and my quilts have been better ever since. If you want to learn how to quilt I highly recommend it. (FYI: The class is a great deal. You get the class plus three quilt patterns all in the cost of the class.)

Next is a quilt I made for another sister-in-law who just had a baby boy.  I loved making this quilt, my favorite baby quilt to date. So simple and quick, just squares and HSTs (half-square triangles). I used lots of different lines in this quilt and they all came together perfectly.


Oh and because I have always wanted to take my own quilt stack picture....here it is.


I finally made, and kept, enough quilts to take one. There is the proof. I am a quilter. I love it.

So there you go! I have quilts on the back burner right now because I am getting ready for the boutique. I am making a couple of quilts for the boutique so I am itching to get started on those.

Hope you are having a Happy Wednesday!

LeAnne

Thursday, April 18, 2013

I Guess You Can Call Me a Quilter

Not that I am denial or anything. :) However, all my posts lately have been about quilts and I always seem to have a quilt in the works so I think I can officially call myself a quilter. When I made my first real quilt back in 2005ish, I didn't think quilting was for me. I am so glad I gave it another try. 

The main evidence that I am a quilter can be in this picture:


Yep, that would be two quilts basted and waiting to be quilted, with a third finished quilt top on top of the stack. Oh and a fourth quilt top that is currently hanging up in my sewing room.  I can't baste the two tops because I have to free up my basting pins from the other two quilts. You'd think that would encourage me to quilt those babies. Nope. Instead of doing that, the other evening when all was quiet, I played around with some fabrics and made these two blocks:


I seriously can't get in the habit of moving on to a new project when I have FOUR waiting to be finished. I will be better. Promise.

 In my last post I shared a finished quilt top. Well here is the finished "family room" quilt as I've been calling it. The pattern is Happy-Go-Lucky from Camille Roskelley's quilting book Simplify. The fabrics are a combo from several different lines. (Mostly Bonnie & Camille from Moda.) If you've read my blog for any amount of time you know I use their fabrics and patterns kinda often. Like all the time often.  I should probably branch out a little more but they just make the best fabrics and patterns!


I will admit I was a little nervous mixing fabrics from different lines. In the end though, I absolutely loved it!  All the fabrics are Bonnie and Camille with the exception of a few generic yellow ones from Joann's. I love that gray and yellow pinwheel print.


This was the first time I used solid binding in a quilt, love it! It is Moda's Bella Solid in aqua. Such a good color. This is the largest quilt I've ever quilted, 63"x75", and this post helped me plan out my quilting so it didn't turn into a hot mess.


Love!


Now just to prove I do sew other things besides quilts, here are two skirts I made for my 3 1/2 year old daughter's Easter basket. Loved making the one with the apron. Such a fun little project.


I love sewing all sorts of projects, but I can honestly say that my love is quilting.


I love it.

Friday, March 1, 2013

just a few little things

So what have you all been up too? Thought I'd drop in and share a few little things I've been up to...


I hopped on the geranium dress bandwagon; so glad I did. I love this pattern! Rae makes one great pattern. Worth every penny for all the variations you can do and all the sizes included.  This was by far one of the easiest dress I've made. Plus it has pockets!  What little girl doesn't love pockets in her dress. (My little lady loves hiding acorns in her pockets!) See many more geraniums in the future for my girls. Need more convincing of the possibilities of this dress? See here, here, and here. Cuteness.


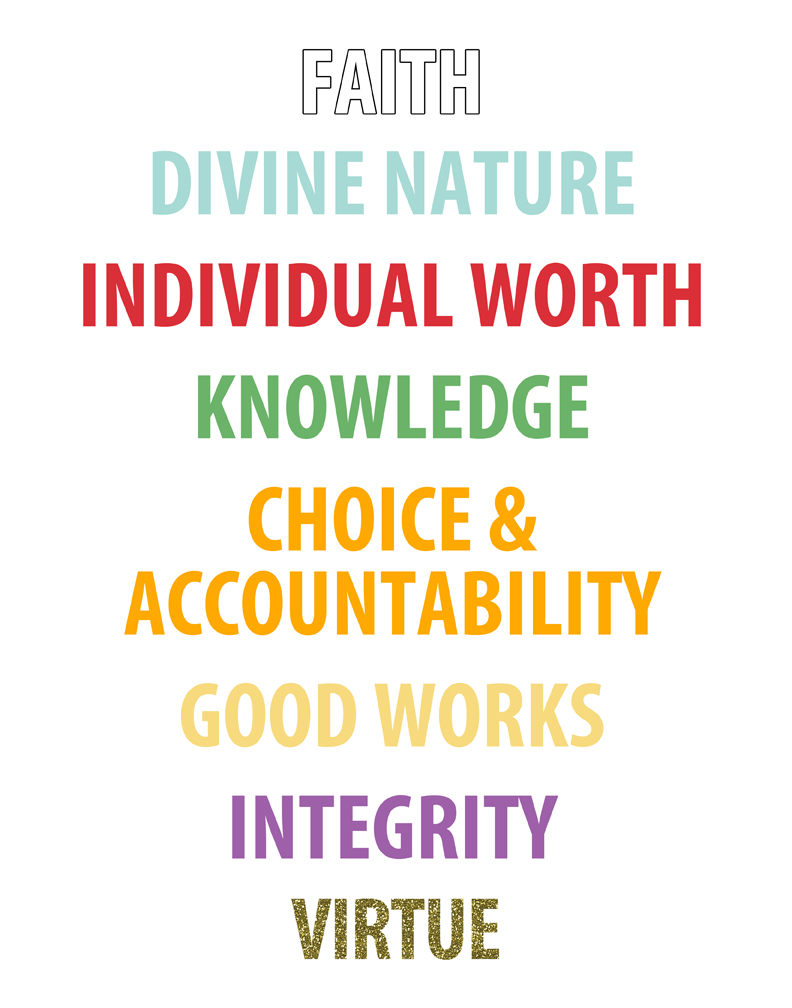
I work with the Young Women in my church, girls from 12 - 18, and this past Wednesday we had our New Beginnings event. This is a night where we celebrate the Young Women's organization, welcome the girls who will be turning 12 over the coming year, and recognize the Young Women that earned their Young Women Recognition Award. (An award that is about the equivalent of an Eagle Scout project in terms of time spent, service projects, and leadership opportunities.) Myself and another woman I serve with were in charge of refreshments and decorations. I had fun making decorations based on the values and colors. I whipped up a poster with all eight values, a simple bunting banner, and some colorful runners. We had cupcakes and jars of candy for the refreshments. (Candy and cupcakes were all the colors of the values.)

Here is the poster I made. Super simple, but the girls really liked it. Go here to download a high-resolution image. (I printed mine as a 16x20 at Costco. However, you can print at any size.)


Yes, another quilt. I've been wanting to make a quilt for our family room for quite a while. I've been collecting fabrics, mixing and matching from various lines, and about a month ago I started cutting everything out. Last night I finished the quilt top and I am loving it! Now I just need to baste this baby and quilt. This is the largest quilt I've machine quilted myself so I am crossing my fingers that all goes well. I am keeping it simple with a simple meandering pattern. Nothing fancy for this large of a quilt. :) Will let you know the outcome.

Then of course there is the usual, family time, daily life, park trips, bike rides, museum trips, library, Target, hikes...lots of fun times around here. :) I have some big things in the works for the coming months. Excited to breathe some new life into this blog and shop.

What have you been up too?

Tuesday, November 13, 2012

the one where LeAnne makes a really big sign

No doubt most of you have seen this great autumn sign tutorial over at Ella Claire. I pinned it back in September with the hopes of turning it into a reality for my fall decor.


Just before Halloween, I was trying to figure out how I could work that large of a sign into my decor. I don't have wall space for that size of sign, but I did have space above my cabinets in my kitchen. Perfect. The next problem was the color. I didn't think that light of a sign would work as my walls are already cream. So I decided on a black sign with cream letters. You can never go wrong with black. So here is my version. All the design credit goes to Ella Claire.


I decided to go big on this sign it measures 60" long by 14" wide. Now I am not going to torture you with saying, "I just found this old board on the side of the street and painted it."  I am NEVER the girl that finds all these great things on the side of the road or at thrift shops. I am not that lucky. I've never even won a giveaway. Ever.

However, I am very lucky to have a wonderful husband that made and had the idea for this board.  He used the pine panels that you use typically for paneled walls that you can find at Home Depot. He cut the panels to size, glued them together, and used some finishing nails to secure everything in place. The panels have two sides. A nice sanded side and a nice rough side. We decided to use the rough side. I painted on one coat of cream craft paint then a layer of black craft paint. (I was not neat when I painted - seriously just slap the paint on the board. ) Then I sanded, using a circular sander to distress. Then I cut a paper stencil using my Cricut for the lettering. I taped the stencils on and painted, painted, and painted. After everything was dry I sanded it again. (I actually sanded it again after I took these pictures.)

So there you have it! A really big, but really terrific fall sign. I love it!

Happy Monday,

LeAnne

Monday, October 29, 2012

Halloween Banner

We are ready for Halloween at our house! Costumes are made, pumpkins are ready to be carved, and  the house is decorated.

Last week I made this fun Halloween Banner for my mantel and I love how it turned out. I made the banner using the Halloween Banner SVG file from Lori Whitlock. I cut the peices out using my Cricut and Sure Cuts Alot software. It was a pretty quick project and can't wait to make some more for other holidays. I hope to find some other fall/Halloween decor on sale this year and built up my stash of fall decor.


 Remember that wreath I mentioned a while back? It has been hanging happily on my mirror, love how it turned out. I also ended up making another for my front door. :) 


Just a little update. I am still working on my quilt tutorial and hope to have that done in a week or so. Can't believe we are Trick or Treating in a few days! I hope everyone has a safe and fun Halloween. I am especially thinking of all those on the East Coast in the path of Hurricane Sandy. It is hitting where I grew up in Maryland, so I am thinking and praying for all there.

Happy Monday!

LeAnne

Monday, September 17, 2012

Naptime Crafting: Fall Wreath

I love fall.

LOVE it.

Maybe it is because I am from the East coast where falls are full of spectacular colors, the smell of burning leaves, raking leaves, REAL pumpkin patches, and every other fall event imaginable.

I've been dying to make a pretty fall wreath for my front door and today was the day.  I have no idea what I am doing when it comes to wreaths - never made one before - so it was a little interesting. I've been having lots of fun with my hot glue gun, wire, and scissors. Only a few burned fingers...so far

Here is my progress so far....


Loving it so far. There is another spot in my house that needs a similar wreath..hmmm. I am liking this wreath making thing.

Now come on AZ get out of the 90s so I can pull out my long sleeved shirts and curl up with a cuddly quilt...and make a batch or two of pumpkin bars.

I love fall. 

Happy Monday,

LeAnne

Monday, September 10, 2012

What I've Been Up To: Busy Bags

It's been two months since I've shared anything over on this little blog...yikes! Sorry about that! Nothing earth shattering has happened, just being mom to two littles under three, life, and other projects. I want to be a better blogger, but when push comes to shove, this little blog gets the push and the shove. :( Sorry little blog.

One big thing I was up to was hosting a Busy Bag Swap. Soon after I joined Pinterest I saw all sorts of ideas for Busy Bags. I started pinning away with the intention of hosting a swap...eventually. Well, eventually finally came and I hosted a Busy Bag Swap with 15 friends and friends of friends. It was a great success and we all walked away with 16 different and awesome Busy Bags. Hosting the event wasn't stressful and I would do another swap in a heart beat!


I am not going to recreate the wheel and go into the details of hosting a swap. I used this great post over at  Second Story Window as my guide in planning and organizing my swap. I basically did everything she tells you to do. If you need ideas for the busy bags see the links at the bottom of this post. She also has a great busy bag board and I think my busy bag board is pretty good too!

A few little things that were helpful to me as a host:

1. Make a board on Pinterest to collect ideas. Best way to do it. Then select your favorite twenty or so and put into a spreadsheet for people to choose from. This way no one has to search for their own idea. (See more on this in #3)

2. Send out an email that clearly explains what busy bags are and how a swap works. I typed up a document and attached it to the email that initially went out. (You can see mine here.) Make your guidelines and budget very clear. Also emphasize that the ideas are just that - ideas. Encourage people to change or modify to fit the budget and to add their personal touch.  I allowed about 4 weeks from the time sign-ups ended to when we had our swap.

3. I uploaded our sign-up sheet to Google Docs and shared it - check the option to share with those who only have the link and include the link in the email. (Otherwise it would be searchable online and the sheet has people's names and emails.) I also enabled the document to be edited by others.  This way people could sign-up immediately - the document auto-saves- instead of emailing me, waiting for me to respond back, recording who is doing what, and then having the chance of two people wanting the same thing. Very helpful for me! (You can see mine here.)

4. Also, we had 16 people in our swap. That seemed like a good number. It wasn't too many bags to make and you still walked away with a lot  of bags. I've talked to some friends about doing a smaller scale swap, like 5 - 6, but where the bags are a little more involved and you could have a larger budget, like here.

Here are the pictures and links to the bags that we made in our swap. Everyone did a fantastic job. I did a rage of activities for older toddlers to preschool age. My little miss, almost three, can do most of the bags below.

1. Popsicle Stick Puzzles


2. ABC City Game

3. Color Popsicle Stick Matching - The maker of this bag added a neat twist for older kiddos. See the Popsicle sticks written with black? She wrote the colors in black and on the reverse side is a flavor that is associate with the color.  So for red it said cherry, orange said mango, purple said grape, etc. Your child then can try and match the color of Popsicle to the 'flavor'.

4. Pattern Matching Game  - She used scrapbook paper she had on hand and was still able to laminate the cards for us and stay within budget! Yay!

5. Button Snake - This one is a favorite. I added more felt pieces after the swap.

6. Lacing Cards

7. Tracing Shapes with Stickers - My little miss has a more interest in sticking the stickers wherever she can. :)

8. Hot Glue Rubbing PLates - Cardboard with shapes made from hotglue/puffy paint. She even included a homemade crayon!

9. Decorate a Cupcake - This was my bag. I had been saving cereal boxes 'just because' and I had a couple yards of flannel that I wanted to get rid of. So I made everyone a mini- flannel board to go with their cupcakes. Don't be that impressed with the 'toppings'. I have a little die cut machine that I used to cut out the flowers, hearts, and stars. 

10. Mini-Chalkboard - These were 5"x7" boards painted with chalkboard paint. Fabulous!

11. Scooping/Transferring Activity - Perfect for toddlers. 

12. Shapes in a Square - Love this one! My little miss isn't quite ready for this one, but great activity. The point is to fit all the squares into the shape.

13. Playdough Mats - She ran four copies off for each of us and made some playdough. She also passed out a the link where we can print off more.

14. Color Number Wheel - Double sided circle with clothes pins with numbers/colors on them. Simply match! (My little miss ran off with one clothespin!)

Color side:

Number side:


 15. Clothes Line - A favorite in our house. This is out almost daily. The maker gave the idea of hanging it outside between two chairs and having your child 'wash' the clothes and hang them up. Perfect for the summer!
 16. Ice Cream Shoppe - So cute!


That's a wrap of our Busy Bag Swap! I love all the bags and so does my little miss. 

Now the only thing I have to figure out is how to store these gems! They are still sitting in the box I collected them in from the night of the swap. Any ideas anyone?


That was my Busy Bag Swap experience! It was awesome. I didn't think hosting the swap was stressful and I would totally host one again. As long as you have clear guidelines and you give deadlines and dates upfront, it really isn't a big deal to organize one. There are so many wonderful Busy Bag ideas out there...so grab a few friends and make some! You won't regret it.

Happy Monday,

LeAnne

Tuesday, July 3, 2012

the summer of quilts

This little beauty of a quilt will be number three for the summer. I've never made this many quilts this close together. In fact, I've never come close to doing this many quilts in such a short time. That means only one thing, I am getting to be a 'faster' quilter. Yay! (Previously I was ridiculously slow when it came to quilting.) I am kinda loving quilting now. LOVING. Now I can finally begin the two quilts I have planned for my family room.


This quilt was for yet another one of my sister-laws who is expecting a little girl this month. I also threw her a shower at my house on Saturday and it was such a good time. Somehow I didn't take one picture of the whole thing. Not sure how that happened. Anyways. Before I rolled this cute little quilt up to give her, I snaped a few pictures of it.


Originally, I was going to make yet another Little Man Quilt from Simplify by Camille Roskelley/ Thimble Blossoms. However, at the last minute, I decided to try something new. I decided on this awesome quilt from Tasha at A Little Sweetness that I pinned awhile back. She doesn't give the fabric measurements in the blog post, but essentially the quilt is just various widths of fabric strips. I just guesstimated widths by looking at her pictures. I wrote down my measurements so I can make this quilt again and I know I will. It makes an awesome gift and comes together in a flash.
 

I lucked out because Little Man calls for fat quarters and I purchased most of these fabrics at Joanns where they don't cut fat quarters from the bolt. So of course I had to buy 1/2 yard cuts. That worked out perfectly because I needed the full width of the fabric to make this quilt. I had some gray Chevron from Riley Blake that I was dying to use in a project and it worked perfectly with the other prints in this quilt. I also pulled a couple of prints from my stash. I love it when I'm able to 'shop' from my stash.


So enough blah, blah, blah. One more quilt done and done. Yay!

Happy Tuesday! Oh and happy 4th of July tomorrow to all my US readers. Not sure how the year is already half over.

LeAnne :)

Wednesday, May 30, 2012

lovely little 'handmade' cards

Sweet simple handmade cards, love 'em.


Doing them digitally so I can quickly made a bunch, love 'em even more.


A couple of weeks ago, I made these cards as prizes for my sister-in-law's baby shower. They turned out super cute so I just had to share. Each pack had five cards, one each of the cards above. I used digital elements and papers I already had in my files:

'shine on', heart, quatrefoil - from Crystal Wilkerson's Project Life Pack (Love these! I'm using in my Project Life Albums, so darling. You can also buy them in printable format.)
label - from Crystal Wilkerson's labels & stickers pack
chevron - from findingnana (Scroll down to bottom of the post for FREE download links)
font - Lobster Two

I made the cards by making a 3.75" x 5.25" (1/4 inch smaller than the finished card size) canvas in photoshop and sized the papers, elements, and text appropriately. Then I dragged that onto a 4"x6" canvas so I could run off as photos at Costco. Then I just had to trim the photos to size. I also rounded the corners with my handy little corner rounder. Funny story. This was the FIRST scrapbooking tool I EVER bought. Amazingly, I still had it in my crafting stash. (I hadn't scrapbooked in over a decade until I recently started doing Project Life.) I got it when I was like 15. I thought it was the coolest thing since sliced bread. Why I remember that...I have no idea. Miraculously, the thing still worked. That is one good product if it still is chugging along after 16 years.


Then I mounted the photos on basic cardstock notecards; don't forget the envelope! (I a set of 50 at Hobby Lobby for 50% off, envelopes included). I did 25 cards for right around $7.00. Score.


Tie up the cards with so me baker's twine and you are good to go!


Makes a great gift, prize, or even just a nice set of cards to have around. I hope to make some more cards using my own designs and when I do I will share them with you all. (I can't share these since the copyrights won't allow me.)

Happy Wednesday!

LeAnne

LinkWithin

Related Posts with Thumbnails