Showing posts with label children. Show all posts

Monday, September 10, 2012

What I've Been Up To: Busy Bags

It's been two months since I've shared anything over on this little blog...yikes! Sorry about that! Nothing earth shattering has happened, just being mom to two littles under three, life, and other projects. I want to be a better blogger, but when push comes to shove, this little blog gets the push and the shove. :( Sorry little blog.

One big thing I was up to was hosting a Busy Bag Swap. Soon after I joined Pinterest I saw all sorts of ideas for Busy Bags. I started pinning away with the intention of hosting a swap...eventually. Well, eventually finally came and I hosted a Busy Bag Swap with 15 friends and friends of friends. It was a great success and we all walked away with 16 different and awesome Busy Bags. Hosting the event wasn't stressful and I would do another swap in a heart beat!


I am not going to recreate the wheel and go into the details of hosting a swap. I used this great post over at  Second Story Window as my guide in planning and organizing my swap. I basically did everything she tells you to do. If you need ideas for the busy bags see the links at the bottom of this post. She also has a great busy bag board and I think my busy bag board is pretty good too!

A few little things that were helpful to me as a host:

1. Make a board on Pinterest to collect ideas. Best way to do it. Then select your favorite twenty or so and put into a spreadsheet for people to choose from. This way no one has to search for their own idea. (See more on this in #3)

2. Send out an email that clearly explains what busy bags are and how a swap works. I typed up a document and attached it to the email that initially went out. (You can see mine here.) Make your guidelines and budget very clear. Also emphasize that the ideas are just that - ideas. Encourage people to change or modify to fit the budget and to add their personal touch.  I allowed about 4 weeks from the time sign-ups ended to when we had our swap.

3. I uploaded our sign-up sheet to Google Docs and shared it - check the option to share with those who only have the link and include the link in the email. (Otherwise it would be searchable online and the sheet has people's names and emails.) I also enabled the document to be edited by others.  This way people could sign-up immediately - the document auto-saves- instead of emailing me, waiting for me to respond back, recording who is doing what, and then having the chance of two people wanting the same thing. Very helpful for me! (You can see mine here.)

4. Also, we had 16 people in our swap. That seemed like a good number. It wasn't too many bags to make and you still walked away with a lot  of bags. I've talked to some friends about doing a smaller scale swap, like 5 - 6, but where the bags are a little more involved and you could have a larger budget, like here.

Here are the pictures and links to the bags that we made in our swap. Everyone did a fantastic job. I did a rage of activities for older toddlers to preschool age. My little miss, almost three, can do most of the bags below.

1. Popsicle Stick Puzzles


2. ABC City Game

3. Color Popsicle Stick Matching - The maker of this bag added a neat twist for older kiddos. See the Popsicle sticks written with black? She wrote the colors in black and on the reverse side is a flavor that is associate with the color.  So for red it said cherry, orange said mango, purple said grape, etc. Your child then can try and match the color of Popsicle to the 'flavor'.

4. Pattern Matching Game  - She used scrapbook paper she had on hand and was still able to laminate the cards for us and stay within budget! Yay!

5. Button Snake - This one is a favorite. I added more felt pieces after the swap.

6. Lacing Cards

7. Tracing Shapes with Stickers - My little miss has a more interest in sticking the stickers wherever she can. :)

8. Hot Glue Rubbing PLates - Cardboard with shapes made from hotglue/puffy paint. She even included a homemade crayon!

9. Decorate a Cupcake - This was my bag. I had been saving cereal boxes 'just because' and I had a couple yards of flannel that I wanted to get rid of. So I made everyone a mini- flannel board to go with their cupcakes. Don't be that impressed with the 'toppings'. I have a little die cut machine that I used to cut out the flowers, hearts, and stars. 

10. Mini-Chalkboard - These were 5"x7" boards painted with chalkboard paint. Fabulous!

11. Scooping/Transferring Activity - Perfect for toddlers. 

12. Shapes in a Square - Love this one! My little miss isn't quite ready for this one, but great activity. The point is to fit all the squares into the shape.

13. Playdough Mats - She ran four copies off for each of us and made some playdough. She also passed out a the link where we can print off more.

14. Color Number Wheel - Double sided circle with clothes pins with numbers/colors on them. Simply match! (My little miss ran off with one clothespin!)

Color side:

Number side:


 15. Clothes Line - A favorite in our house. This is out almost daily. The maker gave the idea of hanging it outside between two chairs and having your child 'wash' the clothes and hang them up. Perfect for the summer!
 16. Ice Cream Shoppe - So cute!


That's a wrap of our Busy Bag Swap! I love all the bags and so does my little miss. 

Now the only thing I have to figure out is how to store these gems! They are still sitting in the box I collected them in from the night of the swap. Any ideas anyone?


That was my Busy Bag Swap experience! It was awesome. I didn't think hosting the swap was stressful and I would totally host one again. As long as you have clear guidelines and you give deadlines and dates upfront, it really isn't a big deal to organize one. There are so many wonderful Busy Bag ideas out there...so grab a few friends and make some! You won't regret it.

Happy Monday,

LeAnne

Monday, January 24, 2011

Tutorial: Felt Valentines & Envelopes

I had a fun time making this little project. This idea has been floating in my head for about a year or ever since I made these last year. After making them I realized, 'Wait! I need to make actual envelopes!' I've had these sweet little envelopes done for about a week but due to a crazy schedule since making them, I am just now posting the tutorial. So here is a fun Valentine tutorial, better late than never, and before the holiday!

Enjoy!


Cute little heart stamps!

Valentines ready to be stuffed and delivered!


Tuck in the flaps to keep those Valentines safe!


Note: You could make 'regular' envelopes to have for pretend play all year. Just make the envelopes out of gray or blue felt.

Materials:
1/3 yard of red, pink, and magenta felt {you could also use felt sheets, but it is cheaper by the yard}
1/4 yard of white felt
disappearing ink pen
thread
hot glue or tacky glue
print template out on cardstock and cut out (click here for template PDF)

Finished Size: 6.25" x 5.5"

1. For each envelope cut:
(1) 6.5" x 9.25" piece of felt {front and flap of the envelope}
(1) 6.5" x 5.5" piece of felt {back of the envelope


2. On the larger piece, measure up 5.5" and mark with disappearing ink pen across the entire envelope.


3. Take template and place on the mark you made as shown below. Trace around the template. This will mark the flap of the envelope.


4. On the smaller piece, place the same template along the top edge of the felt. Trace around the template.


5. Your two pieces will look like this:


6. Take the larger piece and line up the right diagonal mark with the edge of your presser foot. Sew all the way around the flap until you get to the top mark going straight across the envelope.


7. Now line up your needle with the mark going across the envelope. Sew until you get to where you started sewing. Backstitch. Place aside.


8. On the smaller piece, measure down about 1" on each side. Make a rounded edge like shown in the picture below. Sew, lining up your needle with the mark and following the rounded marks you just made.


9. Trim along your sewing lines with pinking shears. On the front piece of the envelope I trimmed about 1/8" - 1/4" away from my sewing line. On the back piece, I trimmed about 1/2" - 3/4" away from my sewing line. Make sure you trim further way from the sewing line on the back piece so you can tuck in the flap. 


11. Cut a little square out of white felt. (I used pinking shears and mine was about 1 1/2" square.) Sew the square in place in the upper right hand corner. (About 1/2" away from the edge.) Hot glue or tacky glue on a little heart.  Or if you have a little helper, have them use tacky glue to glue the heart in place.


12.  To make 'writing' on the front of the envelope I just used a wide zig-zag stitch. Or you could embroider names. To make the stitching stand out I sewed then I backstitched all the way back to the beginning. Then I sewed normally again. When you are taking the envelope off your machine don't pull it off quickly. This will cause the thread to gather and bunch up. Just gently pull your envelope out from under the presser foot just enough to put a finger on top of where you stopped stitching. Then pull the envelope off the rest of the way with your finger holding the threads in place.


13 With the front of the envelope right side down, place the back of the envelope on top. Pin in place as shown. Sew the two pieces together using 3/8" seam allowance. Start sewing at the top mark going across the envelope and continue sewing to the other side. Backstitch at the beginning and end.


14. Trim the rest of the envelope with pinking shears!


15. To make Valentines cut several 4.5" x 5.5" rectangles from white felt. Cut out hearts from scraps of fabric or felt to make Valentines. I hot glued on most of my felt hearts. I also did some fun decorative stitching on the felt before adding the hearts. This is fun to do with kiddos. Have them help you cut out hearts from fabric and felt. Also, have them use tacky glue instead of hot glue. (You also could write notes on paper and place in the envelopes.)


 Fun, festive, and relatively fast! Have fun making these fun Valentines!


Happy Monday!

LeAnne

Friday, October 15, 2010

Tutorial: Halloween Matching Game & Winners!!!!


To see the winners of the trick or treat totes click here.


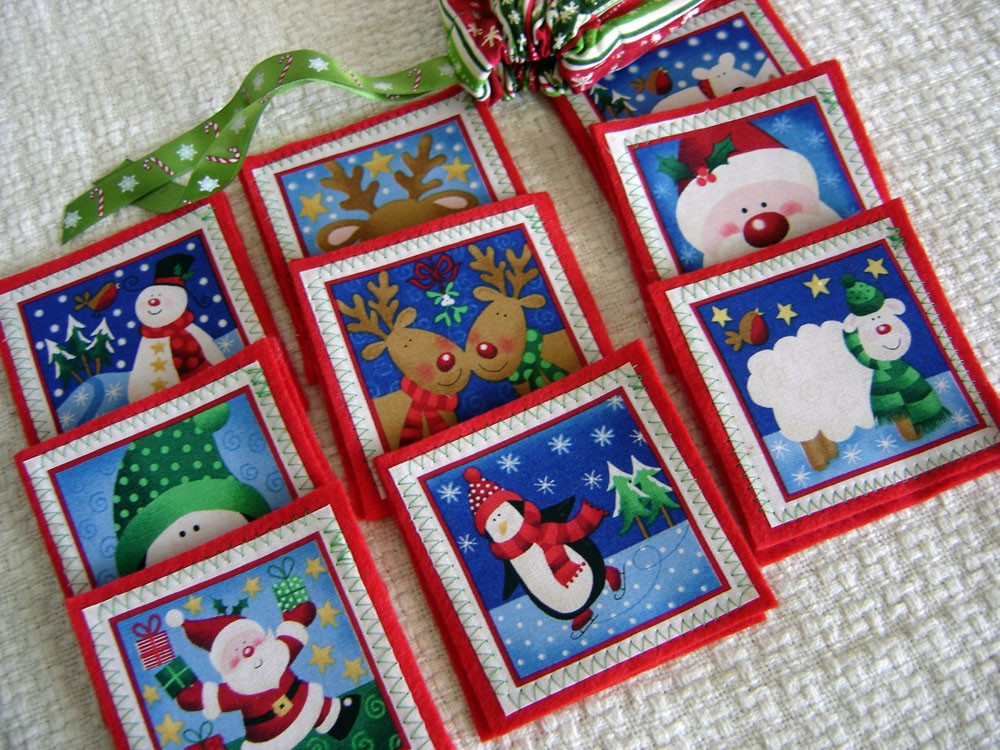
A couple years back I found some adorable Christmas fabric on clearance at a quilting shop and it was so cute that I couldn't pass it up. Of course I didn't know what I could use it for at the time but I bought it anyway. Fast forward to last Christmas and from that fabric I made this cute little matching game. I made a set for my family and a couple of sets for the shop and to give as gifts.


Then a couple of weeks ago I was at Joann's and I found a similar fabric that was Halloween themed. I snagged it and made a little Halloween matching game last night. This is really a quick project and can actually be a no-sew project if you need it to be.


Materials:
fabric that has a 'blocked' repeating print to it
fusible webbing choose either:
Heat n' Bond Lite - if you want to sew (purple package)  OR
Heat n' Bond Ultrahold - if you want a NO sew project (red package)
felt
iron & pressing cloth


Note: When you buy the fabric get enough so the print repeats itself so you have enough to have matching pairs.

1. Adhere the fusible webbing to the wrong side of your fabric. Cut out 'blocked' images using scissors or rotary cutter and ruler.


2. Cut enough squares or rectangles from felt for the entire set of matching cards. I cut mine about 1/2" larger than the size of the fabric images.


3. Remove paper backing from the fabric images and center on the felt squares or rectangles. Fuse in place following package directions. NOTE: Set your iron to WOOL when you adhere fusible webbing to felt or you will MELT your felt. Also place a pressing cloth between your project and the iron.


4. If you used the Heat n' Bond Ultrahold, you do not need to sew to reinforce. So you are done! I used Heat n' Bond Lite, so I just stitched around the inside edge of each fabric image.


5. Optional: Make a quick drawstring bag for storage!


There you go! Easy peasy!  Makes a quick project and a great gift. Don't want to make one? I have one set up in the shop looking for a home.

So now go, whip one up and play a fun festive matching game as a family!


Happy Friday!!!

LinkWithin

Related Posts with Thumbnails